Feeds:
Posts
Comments

Archive for December, 2009

I previously wrote about how growing anything, no matter how small the scale, can get a kid engaged with what they eat.  Some folks insist they have a black thumb.  Bah!  The trick is to take on a project certain to succeed because it assumes failure.  Consider how expensive fresh cut herbs are at the market.  Then take a look at how much a small little 2” x 2” herblette is at the nursery.  Often they are about the same.  Lower your expectations.  Recalibrate success to mean, “Will this last longer in the pot I bought it in than the cut herbs will last packaged in the fridge?”  The answer is yes, for even the blackest of thumbs.

No-Gardening Herb Garden

•    Pick a sunny spot, inside or out

•    Assume there will be an attempt #2

•    Take a trip to the nursery center and find a shallow pot.  Then head to the herb section and pick a few out, placing them in your pot to make sure they fit.  Then pick up a bag of moss.

•    Drive home knowing the plants will die, but you will get a few meals out of them.  Some of them may last only a week.  Some of them may last months.

•    The assembly is really difficult:
Put plastic pots in big pot
Make sure you have a saucer under it if you need to protect your surface.
Surround with moss to hide plastic pots.
Ta-DA! Pour a glass of celebratory wine after a hard day in the garden.

•    Most herbs like to be abused.  Let them go dry between watering and use a scissors or kitchen shears to cut what you need as you need it.

•    Some will die quickly, and others might survive a while. I find chives work very well, while cilantro always croaks the fastest on me and I never bother with it anymore. When a plant dies, just swap it out for a new one.  The nursery may take the old container back to reuse, or your local community college horticulture program might like it.

In any case, much like making sure you have decent spices, having herbs in your arsenal makes basic pantry staples taste better.  When we include The Child in the selection and harvest, she is more curious to try things.  And if it all fails miserably, there is always more wine.

Read Full Post »

Merry Sugarplums

The Child is building a new LEGO set with her dad.  The cat oscillates between my lap and diving under stray bits of wrapping. Dog is sacked out in the morning sun.  I’ve got a new book, hot coffee, and the sugarplums are sugared.  There is still a pile of prezzies under the tree, but Spirograph and LEGOs are proving too tempting, so our holiday morning is punctuated with yummy breaks.

Sugarplums are a new recipe this year, thanks to Alton Brown.  The Child has been raised on Good Eats.  The mix of science, basic techniques, and geeky entertainment is a fixture on our DVR and in our kitchen.  If it’s not already, add it to your DVR to enjoy while kids are on winter vacation.  There will be many future posts on how hugely influential Good Eats has been for The Child, but for now I’ll cut this short with the successfully tested sugarplum recipe and get back to our cozy family festivities.  As he points out in the episode, back when visions of sugarplums first danced in heads, plum really just referred to any dried fruit.  I used apricots, dates, and figs.  Cheers AB!!

Good Eats Sugarplums
Recipe courtesy Alton Brown, 2009

Prep Time:    45 min
Inactive Prep Time:    13 hr 0 min

Ingredients

* 6 ounces slivered almonds, toasted
* 4 ounces dried plums
* 4 ounces dried apricots
* 4 ounces dried figs
* 1/4 cup powdered sugar
* 1/4 teaspoon anise seeds, toasted
* 1/4 teaspoon fennel seeds, toasted
* 1/4 teaspoon caraway seeds, toasted
* 1/4 teaspoon ground cardamom
* Pinch kosher salt
* 1/4 cup honey
* 1 cup coarse sugar

Put the almonds, plums, apricots, and figs into the bowl of a food processor and pulse 20 to 25 times or until the fruit and nuts are chopped into small pieces, but before the mixture becomes a ball.

Combine the powdered sugar, anise seeds, fennel seeds, caraway seeds, cardamom, and salt in a medium mixing bowl. Add the nut and fruit mixture and the honey and mix using gloved hands until well combined.

Scoop the mixture into 1/4-ounce portions (a disher works best) and roll into balls. If serving immediately, roll in the coarse sugar and serve. If not serving immediately, put the balls on a cooling rack and leave uncovered until ready to serve. Roll in the coarse sugar prior to serving.

The Sugarplums may be stored on the cooling rack for up to a week. After a week, store in an airtight container for up to a month.

Makes approximately 80 (1/4 ounce) balls

Read Full Post »

Perhaps this isn’t the best time of year to plant a garden.  But look at it this way, now that the winter solstice has passed, the days can only get longer.  As a kid, on wintry Wisconsin Saturday mornings we watched Roger Swain and his Victory Garden ilk tour gardens around the world in climates more hospitable than ours.  It was somehow more cozy to dream of spring and gardens I’d plant someday.

Now I live in one of those warmer places, and do I have my garden?  Not really.  I have a rich library of books in botany, gardening, and design, but no proper garden.  Condo living means I have had to adapt childhood expectations somewhat.

I garden in pots on a balcony.  It’s not the most conducive spot.  It’s only seven by eight feet, and all supplies need to be tromped up a flight of stairs and through the living room.  There is electricity but no water source, so I schlep water from the kitchen sink.  The epoxy-coated floor is delicate and severely canted, providing good drainage, but that rules out outdoor furniture.  Besides, everything needs to be mobile to allow for homeowner’s association dictated maintenance issues.

My tiny kitchen garden in November 2009

So my balcony garden has become a collection of succulents gifted by friends, and a few edible things in pots.  Our little collection of edibles consists of some lettuce, spinach, and herbs.  The stand, originally sold with a Big Green Egg smoker, was salvaged from a neighbor’s truck bed providing The Child a valuable lesson in the lost art of dumpster diving.  The casters help optimize sunlight exposure, and the tiered plantings mean the herbs on the bottom are watered by runoff from the lettuce planted above.  Some basil and spinach are planted in smaller pots, and volunteer nasturtiums appeared shortly after plunking the basil into the pot.

I experimented this year and added watercress to the garden. I can highly recommend setting up a “water feature” like ours.  Our local vector control office provides free mosquitofish, and a simple siphon means I have my own fish emulsion to fertilize our little container garden.

The Child approaches harvesting with reverence.  And while it’s not much of a harvest, the fun of picking a few pieces of lettuce for a sandwich, or taking a scissors out to cut some chives for her morning eggs, instills an understanding of her food independent of the scale of our little operation.  Chives in particular work well.  They are simple to grow and harvest.  If you let them go to seed by mistake, their purple flowers are also edible.  And the easiest way to chop them is to use a scissors to cut them into small pieces, a great way to put The Child to work in the kitchen.

Adulterated Ramen

1 package ramen noodles

Homemade stock, any variety

Miso paste

Soy sauce

1 carrot

A few spinach leaves

Prepare the ramen noodles as directed in just enough boiling stock to cover the noodles, and throw away the flavor packet.  Put The Child to work with a carrot and a vegetable peeler peeling irregular strips.  While noodles are boiling put some miso paste and a splash of soy sauce in the bottom of two individual serving bowls.  Dissolve miso with some of the boiling stock.  Divide carrot bits between the bowls.  Send The Child out to pick a few spinach leaves.  Divide finished noodles to miso and soy.  Chiffonade spinach and divide between bowls.  (To chiffonade:  lay leaves flat on top of each other, roll the long way and make thin slices down the length of the roll.)  Top off each bowl with hot stock.

Additions of frozen gyoza, leftover steak, or fishcake slices make this a more serious meal.  The Child loves to sprinkle oomoriya shirasu furikake on top because she likes to eat the little dried fishies (a Japanese seasoning with dried sardines, seaweed, sesame seed, dried egg, salt and sugar).  Sesame seeds are an accessible alternative for kids learning to season their own food.  Now break out the chopsticks and practice slurping.

Read Full Post »

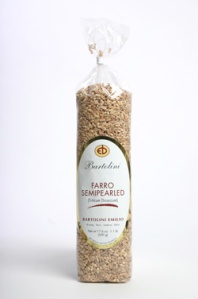
Dinner has been sneaking up on me of late.  Farro has become a dependable staple on those evenings when meal planning has slipped to the bottom of the priority list. It is an easy addition to the emergency pantry as the cooking instructions are just like pasta.

While many whole grains are something The Child tolerates, she genuinely enjoys farro.  Being semi-pearled, some of the outer bran has been removed. That removes some nutrients, but it means this hard wheat can boil up quickly without soaking first.

Triticum dicoccum is an ancient grain.  Farro in Italy, it is known as emmer wheat in the rest of the world.  A close botanical cousin of einkorn and spelt, it’s often translated as spelt despite taxonomical differences.  The history of its wide cultivation in ancient civilizations is geek trivia that appeals to our family.  The Child thinks it’s cool she’s eating something once eaten by Pharaohs and stored inside pyramids.

The farro we purchase is grown on the Bartolini Farm in Umbria.  It is readily available at any well stocked Italian market, deli, or online.  We get ours at Lunardi’s Markets in the pasta and pulses aisle.

Farro is a reliable side dish for visiting kids unaccustomed to eating grownup meals.  I set aside a small amount with just butter and salt for wary wee ones, and it is typically a success once parents can get a kid to try it.  Farro has a nutty flavor and isn’t mushy – so most kids enjoy it right away – even if they aren’t prepared to go crazy with mix-ins.  The rest of the batch gets mixed with a jar of julienne cut sun-dried tomatoes, a small round of goat cheese, some chopped scallions, salt and pepper.  Chopped and roasted asparagus, sliced salami, frozen peas, and pitted olives have all found their way into farro salads at our house.  It’s an excellent fridge-clearing dish.

Leftover salad is fabulous as an omelet or quesadilla filling.  It also makes a great soup with hot broth and grated cheese over a bowl of leftover salad.

Farro Salad

½ package Semipearled Farro (250 g)
1 8.5 oz jar julienne cut sun-dried tomatoes
1 3.5 oz round soft goat cheese
2-3 scallions, chopped
Penzeys Pizza Seasoning or Italian Mix to taste
Salt & fresh cracked pepper to taste

Cook farro in boiling salted water for 12 – 15 minutes.  Drain farro and while hot stir in sun-dried tomatoes with as much of the oil in the jar as you’d like – I typically use most of it.  Stir in crumbled goat cheese – the softer the cheese, the more it will melt into the mix.  Add scallions and seasonings and stir.  This recipe benefits from the addition of grilled and chopped asparagus when it is in season.  Serve warm or at room temperature.

Read Full Post »

The implements you need to get the squishy stuff into the cooing thing need not be elaborate.  There is a lot of “specialized” stuff on the market, but little of it is useful.  Most of us have an army of sippy-cups amassing in the cabinet ready to made a break for it.   The extent to which I had been suckered became apparent when I found myself feeding The Child with a ridiculous perforated spoon.  Really?  I purchased a spoon with holes in it?  How exhausted was I when I bought that?

Quite by accident, we thankfully discovered the flatware we already owned made the perfect baby feeding spoons.  In 1957, Arne Jacobsen designed a line of flatware still in production today.  My in-laws gifted us the incomplete set they’d purchased on sale some 40 years ago, and it included the cutest little coffee and teaspoons. They are brushed stainless and have held up to decades of dishwashers. Machined beautifully, they have smooth, polished edges on them.  They are functional as pretty condiment spoons when baby feeding years are long gone, and apparently beautiful enough that guests of my in-laws pocketed several of them over the years.

It is impractical to upgrade your flatware for a single utensil, but George Jensen sells a set of two tiny espresso spoons packaged separately for $30.  The dessert fork and dessert spoon are packaged as a Child Set for $38.  There are also two excellent intermediate sizes, the coffee spoon and the teaspoon, available as an open stock purchase from any George Jensen store.  When I called the Southern California store to augment our set recently, their service was excellent even on a tiny order.

Be aware that the Child Set has a real fork with properly stab-enabled tines on it. The forks packaged in most tableware sets are just for show and are unable to stab food.  We owned the E-Z Grip spoon and fork set made by Sassy.  The spoon could not be purchased separately at the time, so the fork quickly became a teether when The Child’s molars erupted.

Come to think of it, the absurdly perforated spoon came from that set too.  Apparently sufficient numbers bought into the hype, so it is independently packaged now as the Sassy Baby Less Mess Toddler Spoon. The claim is surface tension of the food in the holes helps keep the food on the spoon longer than with a standard spoon.  Do I really need to state the obvious here?  It doesn’t.  Also, in order to accommodate the holes the spoon has to be impracticably wide.  By the time The Child’s mouth was big enough to comfortably use the spoon, she wanted what we used anyway.

The narrower E-Z Grip Spoon from Sassy was actually quite useful once we were in self-feeding toddler years.  But for a while it lived in the bathroom.  The temperature dependent color-changing feature was pointless in the kitchen as it only changed color when food was dangerously hot, and typically a quick taste test could determine that.  But floating in the bathwater while the tub filled, it was a useful indicator if the bathwater was too hot.

When it comes to what you need as you introduce solids, any narrow, smooth-edged small spoon should be fine.  It needs to fit well into little mouths and get every last bit of the expensive organic stuff out of the jar or bowl.  It doesn’t need to be coated with anything soft and rubbery.  It doesn’t need to change colors, and it certainly doesn’t need holes in it.

Read Full Post »

This was a go-to recipe when The Child was younger, and I had forgotten just how easy it is!  I made it for lunch this week and then split the leftover soup with The Child for dinner.  For something showcasing a pantry ingredient, it tastes very fresh.  I used homemade beef broth and San Marzano tomatoes, the only canned tomatoes that come close to the fresh ones we grew and canned as a kid.  Save the liquid from the drained tomatoes for a pot of chili or to add to vegetable broth, I can’t let anything go to waste.  Instead of a blender, I used a food processor to avoid hot soup blender explosions.  I love thermodynamics experiments, but less so when they involve a burn unit.  I also chose not to strain it this time – which gave the soup a more hearty, wintry texture.

For kids old enough to help in the kitchen, this is a good division of labor recipe.  Let the kid preheat the oven, measure and pour things, use a can opener and a strainer, and have them prep the garlic.  A dough blade works very well for kids to smash garlic cloves safely for easy peeling.

Thank you Cooking Light Magazine!

Creamy Tomato-Balsamic Soup from Cooking Light
Cooking the vegetables at the high temperature of 500° caramelizes their natural sugars and deepens their flavor; the liquid poured over them ensures they won’t burn. Prepare the soup up to two days ahead; reheat over medium heat before serving.

1 cup less-sodium beef broth, divided
1 tablespoon brown sugar
3 tablespoons balsamic vinegar
1 tablespoon low-sodium soy sauce
1 cup coarsely chopped onion
5 garlic cloves
2 (28-ounce) cans whole tomatoes, drained
Cooking spray
3/4 cup half-and-half
Cracked black pepper (optional)

Preheat oven to 500°.

Combine 1/2 cup of broth, sugar, vinegar, and soy sauce in a small bowl. Place onion, garlic, and tomatoes in a 13 x 9-inch baking pan coated with cooking spray. Pour broth mixture over tomato mixture. Bake at 500° for 50 minutes or until vegetables are lightly browned.

Place tomato mixture in a blender. Add remaining 1/2 cup broth and half-and-half, and process until smooth. Strain mixture through a sieve into a bowl; discard solids. Garnish with cracked black pepper, if desired.

Yield:  4 servings (serving size: about 1/2 cup)

CALORIES 120 (35% from fat); FAT 4.7g (sat 3g,mono 1.5g,poly 0.1g); IRON 1.7mg; CHOLESTEROL 23mg; CALCIUM 120mg; CARBOHYDRATE 14.9g; SODIUM 452mg; PROTEIN 3.8g; FIBER 1.7g

Cooking Light, OCTOBER 2005

Read Full Post »

Bring On The Mush

Our pediatrician had a few basic guidelines when it came to introducing solids:  Nurse as long as you can.  Begin providing new foods between four and six months.  By nine months, he told us, except for nuts and honey The Child should eat what we eat.  Except how is that even possible?  At five days per allergy screening, it would take three months to expose her to roughly 18 ingredients.  We eat a lot more than 18 ingredients.  Where should we start?  And how the heck was this going to work?

I had my own addenda to the guidelines:  Family meals had to happen as soon as possible.  No calories in the crib.  And I did not want to feed her anything if I wouldn’t lick the spoon myself.  That meant all meat and green vegetables would have to come from scratch instead of a jar, so we made our own baby food.

I nursed for 15 months, and The Child’s first food was yogurt at 5 ½ months.  Plain Whole Milk Yogurt from the Straus Family Creamery.  No sugar, no fruit, no flavorings.  Yogurt was something she watched me eat all the time, and had already expressed an interest in tasting. She quivered at the tang the first few times but wanted more.  After a week of yogurt we introduced baby rice cereal. This was not received as well as the yogurt, but once a pattern between the two bowls was established, the incentive to get more yogurt got some rice cereal down without too much fuss.  For the next two months she continued on the rice cereal and yogurt every day, while we slowly introduced avocado, sweet potato, banana, apple, carrot, and egg yolk.  The Child detested fresh bananas but loved store-bought organic banana baby food.

Waiting a week for an allergy screening was overkill. We have no family history of food allergies.  But we were really exhausted, and Saturday morning routinely became new-food day.  This habit had some other advantages.  It provided a weekend day to shop, prepare, freeze, and label, leaving us more prepared during the week.  The Spouse’s work and travel obligations were dramatically increasing, so focusing on new foods each weekend meant both of us were participating in new food time as a family activity.  Just as weekend cooking had been a favorite thing to do together before we were parents – it was now part of our family focused weekends.

We started a list of what we had introduced and when, using a Post-It inside the kitchen cabinet door.  In the first few weeks it’s easy to keep track, but months later we were glad there was a readily accessible list reminding us what had been cleared.  We also methodically screened oils, vinegars, and spices for allergies as well.  I’d never heard of anyone being allergic to olive oil or fresh cracked pepper, but we wanted to make sure we started building a list of cleared ingredients to make flavorful food.  Steamed carrots are okay.  But covered in olive oil and seasoned with salt and pepper before roasting…  those are carrots we all want to eat for dinner.

At nine months she was eating everything we ate, three meals a day.  She still nursed in the mornings and once before bed.  We quit middle-of-the night feedings cold turkey around this time as well.  We’d figured out how to creatively cook with a smaller set of gradually expanding ingredients, and there was less panic because introducing new foods wasn’t just an allergy avoidance thing anymore.  It morphed into a habit of regularly trying new things which continues to this day.

The Child’s first real meal was grilled lamb with roasted onions, bell peppers, and potatoes.  It had seasoning, caramelization, and flavor.  And it turns out when you scoop a little of everything into a blender – your puree will be this hideous gray mush that smells and tastes just like grilled lamb with roasted vegetables should.  Even when you’re the mom licking the mush off the spoon.

Read Full Post »

I Heart Penzeys

When I discovered Penzeys Spices, I was living in Southern California, learning to cook Indian food, on the hunt for spices beyond the grocery store.  Finding out the company is family-run and near my childhood home was just an added plus – the quality of their product and service has made me a loyal customer for over a decade.

While they do sell their products online, and that is typically how I order them, I would recommend getting a copy of their catalog anyway.  Much like a favorite magazine, it’s the kind of publication you can curl up with and get lost in.

I’ve never been one for gimmicks, and to me the “spice blend” has always been just that, a gimmick.  Why mix salt, garlic, and parsley together on your own, when you can pay Lawry’s extra for the modified food starch, sugar, and partially hydrogenated cottonseed oil too?

But the folks at Penzeys have tweaked that worldview a bit.  They don’t put any of that junk in their blends.  And they employ a clever but ancient marketing strategy… free samples.  That first shipment came, and the little bottle of English Prime Rib Rub was an instant success.  Over the next few years, their Apple Pie Spice, Pizza Seasoning, Turkish Seasoning, Italian Herb Mix, Pork Chop Seasoning, and Barbeque Of The Americas have hit our table like a new street drug hits the corner.

Okay.  Maybe that’s laying it on a bit thick.  But seriously, there has not been a visiting picky kid who doesn’t like the Pizza Seasoning.  The 4-year old who didn’t want more than a box of the orange stuff and a hot dog, ate all his peas when they were covered in butter and Pizza Seasoning.  Some warier older kids eyed a pasta salad with suspicion once, but they cleaned their plates and asked for more. I don’t know if it works because it has pizza in the title, or because the kids are at someone else’s house, or because I’m not their parent.  It works.  I don’t question the magic.  It does a wonderful job on pizza too, whether working from scratch or just customizing a frozen store-bought thing with your own goodness.

I use Penzeys stacking jars for storage and purchasing spice refills as needed.  They fit perfectly double stacked in the Kraftmaid full-extension drawer we chose 7 years ago.  I’m enough of a details freak to have printed some removable adhesive labels with the name, date of purchase, country of origin, Scoville units, etc.  Occasionally I even make sure they are alphabetized in my drawer.  I can let the laundry go for a week, but I’ll spend hours obsessing over the spice drawer.  It’s sad but true.  I’m not proud.

…except that I am!!  Look!  See how pretty??

I like tossing Penzeys a few extra bucks and buy my jars from them.  But if your current storage method would prefer a different sized jar, I recommend soil-sampling jars sold by your friendly, local environmental testing lab.  You know, the place you should go take a sample of your drinking water on occasion if you have your own well??  The brilliance of soil-sampling jars for spices is that they all have a Teflon disk inset in the lid.  Think about it.  They are designed not to let any vapor transfer in or out in between the sample collection location and the lab.  Use these jars in a cool and dark place and your spice investment will last a very long time.

So get yourself a copy of the latest Penzeys Spices catalog and see where it takes you.  Maybe you needed a few things anyway?  Especially the Pizza Seasoning.

Read Full Post »

So we all know at least one of them, and we all know the type:  The compulsive baker.  The kind of kitchen genius so skilled, they can freestyle baking.  I’ve gotten quite good at throwing some ingredients together and whipping up a meal.  But baking is about measuring and ratios and technique beyond mere technique.  For baking, I need a recipe.

I have a compulsive baker in my life right now, and Kay shared a recipe with me early in the fall which has been life changing.  It’s so tasty, and yet it packs some serious nutrition.  Nutritious doesn’t mean low-calorie, and it is definitely a sweetened baked good.  But when The Child asks for cake for breakfast, it’s an easy yes.  This one is 100% whole-wheat flour and roasted sweet potatoes.  It is really a quick bread instead of a cake.  But The Child wants to call it cake and eat whole-wheat anything?  Cake it is.

I love that it uses up sweet potatoes we typically have from our weekly spud! delivery.  We have made it several times this fall, and have a few observations.  Because there is variation in the estimation of the “two medium sweet potatoes” the bread has occasionally stayed dense and sunk down a bit in the middle.  No amount of extra baking seems to firm it up, but it’s still very edible in this case albeit less pretty.  Also, the first time I made it I didn’t have ground cloves, so I made due with a mix of Penzeys Apple Pie Spice and ground ginger.  It turned out so well I immediately replenished my spice drawer – knowing I’d make it again and again.

When Kay initially passed this recipe along, she apologized for the inconvenience of having to roast the sweet potatoes first and wait for them to cool.  I’ve found roasting them first thing in the morning on a foil wrapped cast iron skillet is easy at 400°F for an hour.  Then they cool on the counter while I take The Child to school.  Meanwhile, Kay has experimented with canned sweet potatoes and found the batter to be just too wet.

The recipe follows.  I hope you like it as much as we do!  Hopefully Kay will start her own cooking and baking blog to start sharing her many secrets.  A special thanks to her for allowing me to share this one here.

Kay’s Maple Sweet Potato Spice Bread

Note:  This bread works best when all ingredients are at room temperature, and when you use whole wheat flour.

2 medium sweet potatoes
3 cups (15 ounces) whole wheat flour
1/2 tsp salt
1 heaping Tbsp baking powder
2 tsp baking soda
1 Tbsp cinnamon
1 tsp nutmeg (fresh grated if possible)
1 tsp ground cloves
1/2 tsp ground ginger
10 Tbsp butter, at room temperature
1 1/2 cup (10.5 ounces) firmly packed brown sugar
1 Tbsp vanilla
4 eggs
1 cup milk
1 1/2 cups maple syrup

Heat oven to 350.  Grease and flour 2 loaf pans (9×5 inches)

1.  Bake the sweet potatoes.  Take out of oven and cool to room temperature.  Then, peel the potatoes.
2.  Meanwhile, you sift the flour, salt, baking powder, baking soda, cinnamon, nutmeg, cloves and ginger into a large bowl.
3.  Cream the butter and sugar.  Add the cooled sweet potatoes and mix to combine.  Add vanilla, eggs milk and maple syrup and mix to combine.
4.  Fold the wet ingredients into the dry ingredients.  Do not over-mix.
5.  Pour the batter into 2 medium loaf pans.
6.  Bake at 350 for about an hour.  A knife or tester placed in the middle of the bread may come out looking slightly wet, but this is probably OK.  If it’s soupy, you’ll need to put it back into the oven.
7.  Take the bread out of the oven to cool.
8.  THIS IS IMPORTANT:  let the loaves cool on a rack IN THE PAN for 15-20 minutes before turning them out.  This will let them continue to cook until the loaves are done.

Enjoy!

Read Full Post »

Give a shallot, a carrot, a rib of celery, and a few sun-dried tomatoes a small dice.  Saute them in olive oil with kosher salt, fresh ground pepper, and some Penzeys Pizza Seasoning spice mix for a minute or two.  Then ladle in some homemade stock of any variety – I made beef stock earlier in the week.  I added some tomato juice until it looked right, but a little marinara or tomato paste would work as well.  Open and rinse a can of Great Northern Beans to go in the pot next (or any kind that sounds tasty – garbanzos are The Child’s current favorite).  As it reached a simmer I added leftover buttered farro from last night’s dinner and some frozen corn.

We even had enough left over for tomorrow!

This was exceptionally tasty after a day spent out in the cold.  The farro gave it a bite reminiscent of barley but without the long cooking time.  In hindsight I ought have added a little frozen chopped spinach for color. This meal took less than 20 minutes to make, including veggie prep time and helping The Child finish up her homework for the week.  Makes enough for a Mom and kid to get two meals out of it.

Pouring hot homemade stock over any number of ingredients is an excellent technique for throwing together something quickly.  I watched Jacques Pépin make his Peasant Soup on TV ages ago and thought, “Well duh!”  The technique was instantly appropriated.   We do this often with toasted, stale bread cubed in individual bowls.  Maybe add some sliced leftover sausage, and some frozen peas.  Ladle on the hot stock, grate a little real Parmesan over top, and that’s a comforting meal anytime even when it seems there is nothing in the house to eat.

Read Full Post »

Older Posts »